Quantcast
Channel: Nagios Labs
Viewing all 65 articles
Browse latest View live

How to Add Nagios Network Analyzer Reports in Nagios XI

$
0
0

If you are currently using both Nagios XI and Nagios Network Analyzer, the release of Nagios XI 2014 has made it very easy to add Nagios Network Analyzer reports in XI. All you need to do is to configure the Network Analyzer Component in Nagios XI. Here’s how you do it:

  • From the Nagios XI Web interface, click on the Admin menu, then click on the Manage Components menu.
  • Find the Nagios Network Analyzer Component and click on the Edit Settings button.
  • Click the Add a Server button.
  • Enter the required information, and click Apply Settings.

Nagios Network Analyzer Component Settings

Once the Network Analyzer Component has been configured, you can view the Network Analyzer reports by clicking on the Network Report or Network Query links under the Available Reports section.

Nagios Network Analyzer Report in Nagios XI

It’s as simple as that! If you would like to further explore new features and capabilities of Nagios XI 2014, you can download a fully functional Free 60 Day Trial. Make sure you also download our Free Trial of Nagios Network Analyzer to check out this component!

Don’t forget, Nagios World Conference 2014 is taking place this October! Register here to save 10% on your conference pass!

Come See Ludmil Miltchev present at Nagios World Conference 2014

Happy Monitoring!


How to Passively Monitor Windows Machines with NRDS & Nagios XI

$
0
0

In my previous article, I demonstrated how easy it is to passively monitor Linux machines with Nagios Remote Data Sender (NRDS) and Nagios XI. In today’s article, I will cover passive monitoring of Windows machines via NRDS.

Monitoring Windows machines via NRDS is no different than monitoring Linux boxes. You need to follow the same three steps:

  1. Adding Configuration
  2. Client Installation
  3. Configuring the host and its services

Step 1 – Adding Configuration

Go to Admin -> Monitoring Config -> NRDS Config Manager, click on Create Config, select Windows (32- or 64-bit) from the Operating System drop-down menu, and click on the Next button. You will see the Edit NRDS Config page. Most of the config options will already be populated for you with the default options. All you will need to do is type a config name, select a token from the drop-down menu, and click on the Apply button. For this example, we will be creating a config called “Win7x64”.

Edit NRDS Config

For more information on editing configuration files in NRDS, please watch the video below:

Watch this video on YouTube.

Step 2 – Client Installation

Now we must install the client. Go back to the NRDS Config Manager (Admin -> Monitoring Config -> NRDS Config Manager). You will see the new configuration file that you just created (in this case it is called “Win7x64″).

NRDS Config Manager

Click on the Client Install Instructions button (the “Notepad” icon). You will be presented with a download link to the executable, that you need to run on the Windows client.

Save the executable on the client and double-click on it to run the installer.

NRDS Client Installation

A new scheduled task will be created if you selected the “Create Scheduled Task” checkbox during the client installation. The task will run on a time interval that you specified. As you can see above, I selected a time interval of 5 minutes. You can view the tasks in the Windows Task Scheduler:

Windows Task Scheduler

Step 3 – Configure The Host And Its Services

The last step is to configure the host and its services. From the Nagios XI web interface, click on Admin -> Monitoring Config -> Unconfigured Objects.

Select the checkbox next to the host, and click on the Configure button (the blue triangle).

Unconfigured Objects

Click on the Next button to proceed and complete the Unconfigured Passive Object Monitoring Wizard.

You have now successfully configured a Windows host for passive monitoring with NRDS in Nagios XI.  The checks can now be viewed in the Service Status Dashboard.

Service Status Dashboard

For more information about passive monitoring with Nagios XI and NRDS view this document:
Passive Monitoring with NRDS and Nagios XI

You may also watch the NRDS video tutorial here:
Nagios Remote Data Sender Tutorial

If you’re new to Nagios XI, download the fully functional Free 60 Day Trial to get started!

Don’t forget, Nagios World Conference 2014 is taking place this October! Register here to save $100 off your conference pass!

Come See Ludmil Miltchev present at Nagios World Conference 2014
Happy Monitoring!

How to Monitor Domain Expiration with Nagios XI 2014

$
0
0

Nagios XI - Domain Expiration WizardAnyone who rents or owns a domain knows that its registration will expire unless it is renewed. An expired domain can cause loads of issues for groups who rely on the accessibility of said domain whether they are large or small. One major issue that can stem from an expired domain in which you may have forgotten to renew is that a “squatter” could potentially register that domain under their own name and grab your valuable traffic for themselves. With the new Domain Expiration Wizard you can monitor down to the day of when your domain will expire. This is done by checking against the registrar to determine the time remaining so that you can renew your registration before it becomes too late. This is only one of the new wizards included in our latest release of Nagios XI 2014.

The Domain Expiration wizard can be ran in a few easy steps:

  • First, Enter the address of your domain:

Nagios XI - Domain Expiration Wizard

  • Next, you will need to give it two thresholds. In this example, we want Nagios XI to warn us if the domain is going to expire in 30 days, and then we want a critical alert when the expiration is within 10 days:

Nagios XI - Domain Expiration Wizard

 Finally, you will set up your basic check and notification settings as you would with any other wizard. That’s it, a very simple wizard to set up for the valuable information you will reap!

Nagios XI - Domain Expiration Wizard

This wizard comes prepackaged with Nagios XI 2014. If you would like to try out the Domain Expiration Wizard and see the latest version of Nagios XI 2014 in action you can download a fully functional Free 60 Day Trial.

Don’t forget, Nagios World Conference 2014 is fast approaching! Register today and save $100 on your conference pass!

Come See Sam Lansing Present at Nagios World Conference 2014

Nagios Cloud Monitoring Now Available in Sydney Australia

$
0
0

TheAmazon Web Services (AWS) latest Nagios XI – Amazon EC2 cloud images have been pushed out to the following additional location:

  • Australia (Sydney)

The Nagios XI cloud images are an excellent opportunity to try Nagios XI without having the upfront expense of dedicated hardware and can be upgraded with virtually zero downtime.

Documentation on using the Amazon cloud images for your Nagios XI deployment may be found on the Exchange.

Using Nagios XI In Amazon EC2 Cloud

This document describes how to launch a new pre-installed Nagios XI server in the Amazon EC2 cloud and is intended for Nagios XI Administrators who would like to bring up new Nagios XI instances in the Amazon Elastic Compute Cloud (EC2), as well as those who are moving existing installations to the cloud.

Start a trial copy of Nagios XI in the cloud today!

Come see me present at Nagios World Conference in October! Use discount code LABS100 and save $100 on your conference pass – register here!

Nagios World Conference

Monitoring Apache Cassandra Database Nodes with Nagios XI

$
0
0

As cloud services grow in popularity, so do the networks that provide those cloud services.  Few webserver-based distributed databases are as easy to install and configure as Apache Cassandra.  Apache Cassandra is an open source distributed database management system designed to handle large amounts of data across many commodity servers, providing high availability with no single point of failure. Cassandra offers robust support for clusters spanning multiple data centers, with asynchronous master-less replication allowing low latency operations for all clients.

Cassandra relies on the Java platform, and as those of you who have tried to configure Java app monitoring most likely know, the experience can be painful.  There are a handful of plugins on the Nagios Exchange that attempt to simplify the configuration.  As these plugins rely on the Apache Cassandra utility “nodetool”, you either need to install Cassandra on the Nagios server (which is not suggested) or use an agent (like NRPE) to run the plugin script directly from the Cassandra server (which should have the nodetool utility).

The Cluster Node Check is designed to verify whether the number of live nodes is less than a specified number, and if so trigger a warning or critical alert within Nagios.

1. Download and install the NRPE agent on the Cassandra server.  Follow our linux-agent installation document below:
http://assets.nagios.com/downloads/nagiosxi/docs/Installing_The_XI_Linux_Agent.pdf

If you experience issues with the NRPE install, refer to the following troubleshooting document:
http://assets.nagios.com/downloads/nagiosxi/docs/NRPE_Troubleshooting_and_Common_Solutions.pdf

If you are not running CentOS or RHEL on the Cassandra server, you may need to compile NRPE from source:
http://assets.nagios.com/downloads/nagiosxi/docs/Source_Based_NRPE_Installation_and_XI.pdf

2. Download the Plugin:

Once NRPE is installed, you will need to run the following commands from your Cassandra server command line to download the check_cassandra_cluster.sh script.

cd /usr/local/nagios/libexec
wget https://raw.github.com/hashnao/nagios-plugins/master/check_cassandra_cluster.sh
chmod +x check_cassandra_cluster.sh
chown nagios:nagios check_cassandra_cluster.sh

3. Verify check from Cassandra Server Command Line:

It is a good idea to run the plugin locally to verify that it works, before moving on to test it from the Nagios Server.  To do so execute the following command from the command line on the Cassandra server.

/usr/local/nagios/libexec/check_cassandra_cluster.sh -H localhost -P 7199 -w 1 -c 0

You should see output similar to:

OK - Live Node:2 - 127.0.0.1:Normal,70.97,KB100.00%,940153922094527000 |     Load_127.0.0.1=KB100.00% Owns_127.0.0.1=940153922094527000

4. Configuring the check in nrpe.cfg:

In order for Nagios to execute a command on a remote server, you need to add the plugin to the nrpe.cfg on the Cassandra server.  Edit the /usr/local/nagios/etc/nrpe.cfg file with your favorite text editor by adding the following line at the bottom of the file.

command[check_cassandra_cluster]=/usr/local/nagios/libexec/check_cassandra_cluster.sh $ARG1$

Verify that “dont_blame_nrpe=1” is configured in the nrpe.cfg on the Cassandra sever as we are passing arguments to the server.

Restart xinetd on the Cassandra Server (or the nrpe service if you compiled from source) by running the following command.

service xinetd restart

Test the check from the XI server command line.  Make sure to replace <Cassandra server ip> with the IP address of your Cassandra server and also replace <ip of Cassandra node to check> with the same IP address or a different IP address of another Cassandra server.

/usr/local/nagios/libexec/check_nrpe -H <Cassandra server ip> -c check_cassandra_cluster -a '-H <ip of Cassandra node to check> -P 7199 -w 1 -c 0'

You should see output similar to:

OK - Live Node:2 – 127.0.0.1:Normal,71.54,KB100.00%,-9165324447555808428 127.0.0.1:Normal,71.54,KB100.00%

5. Add the check_cassandra_cluster command to XI:

In XI, go to  Configure -> Core Config Manager -> Commands.  Click “Add New“.

Enter “check_cassandra_cluster” for the Command Name.

For the Command Line enter:

$USER1$/check_nrpe -H $HOSTNAME$ -c check_cassandra_cluster -a '-H $ARG1$ -P $ARG2$ -w $ARG3$ -c $ARG4$'

Save changes and “apply configuration“.

6. Create a Host in XI for your Cassandra Server:

You will need to set up the Cassandra server as a Host in Nagios XI if you have not done so already.  To do so, use the following steps.

In XI, go to Configure -> Run the Monitoring Wizard.

Select a Linux Server and enter the IP address of your Cassandra server and distribution.  Select Next.

Select any services you wish to monitor and select Next.  (Note: you do not need to download the agent as that has already been done in step 2 above.)

Set your Monitoring settings and click Finished.

7. Create a service check in XI:

In XI, go to Configure -> Core Config Manager -> Services and click “Add New“.

Enter a name for the check and select Check_Cassandra_Cluster from the check Command Drop Down.

Configure the arguments:

$ARG1$:  The IP address of the Cassandra node to check
$ARG2$:  The Port that the Cassandra node is listening on (default is 7199)
$ARG3$:  Warning threshold – Integer for number of nodes or less report WARNING
$ARG4$:  Critical threshold – Integer for the number of nodes or less to report CRITICAL (must be less than $ARG3$)

Add the Cassandra sever to the check through the “Manage Hosts” button.

Continue configuring the service object as you normally would using templates, check and alert settings, etc.

Save and Apply Configuration.

The check should now be active and working.

The full documentation can be found below

Monitoring Apache Cassandra Databases with Nagios XI


If you are unfamiliar with Nagios XI, you can download the fully functional Free 60 Day Trial.

Also, Nagios World Conference takes place October 13-16, 2014. Use discount code LABS100 and save $100 on your conference pass - register today!

Monitoring Weblogic Metrics with Nagios XI

$
0
0

Weblogic is a popular Java-based application server that acts as a middleware between the application and the Java environment.  It provides a framework for developing traits such as reliability (recovering from failures), scalability (dynamic service scaling) and security (unified security system for apps).  Nagios XI has the ability to monitor various aspects of Weblogic using wlsagent as outlined in our document Monitoring WebLogic With Nagios XI. In this post I will expand upon some of those metrics, such as what they mean and why they are important.  Links to further reading will be provided where relevant.

Nagios XI Service Status Dashboard

HeapSize
Current heap size in MB.  This value typically will not change on its own, as this is set (usually manually) in the java settings.  Changes in this value may be indicative of an administrator tweaking the performance settings of the JVM.

Java Heap Notes

UsedMemory
Current used memory in MB.  A fraction of the total heap, this value fluctuates with use.  Abnormally high values could indicate either increased traffic to the java application, or possibly a memory leak.  If this regularly approaches the maximum heap size, you might consider increasing that value.

ThreadPoolSize
Total number of threads in the pool.  Each thread is capable of handling a unit of work such as processing an order or verifying an email.  The bigger the pool, the more concurrent tasks can be handled.

Thread Pool Theory

ThreadActiveCount
Active thread count.  This is the number of threads currently doing work.  A high value, as with the UsedMemory metric, could indicate heavy usage of the applicaiton.  This metric is related to the ThreadHoggingCount and ThreadStuckCount metrics discussed below.

ThreadHoggingCount
Number of threads being hogged by a request for more than the execution time.  Some threads will be used by a process for a long time, which could be caused by network lag, CPU load, or a logical loop in the application.

Stuck Threads Intro

ThreadStuckCount
Number of threads that have been hogged for long enough.  After being hogged for a certain time, a thread will be marked as stuck.  This is a fairly common problem in WebLogic, although it does not always indicate a real problem.  A method that calls sleep() for 10 seconds might be marked as stuck but still be functioning properly.

Stuck Thread Detection
Stuck Thread Removal

Throughput
Mean number of requests completed per second.  This is simply a measure of how much “work” is being done per second, usually related to either transactions or thread executions.

I have covered the more popular metrics, however on the wlsagent wiki page there are examples of a few others you might be interested in.  Feel free to browse those checks, and if you have any questions don’t hesitate to contact us on the Nagios Support Forum.

If you would like to further explore features and capabilities of Nagios XI, you can download a Free 60 Day Trial to get started.

Also, Nagios World Conference 2014 takes place this October! Register here and enter discount code LABS100 to save $100 on your conference pass!

Nagios Log Server vs. Elasticsearch – Logstash – Kibana

$
0
0

Recently I was asked the following questions via email and thought it would make a great post to explain the differences between deploying Nagios Log Server or just the Elasticsearch, Logstash, Kibana Stack (ELK).

The question was as follows:

In the company I currently work with, we were thinking about deploying ElasticSearch and Logstash along with Kibana, in order to further facilitate log processing and visualization.

What would the added value be if we went for Nagios Log Server instead of ElasticSearch, Logstash and Kibana?

Is there any downside in choosing to install ElasticSearch, Logstash and Kibana on our own instead of installing Nagios Log Server?

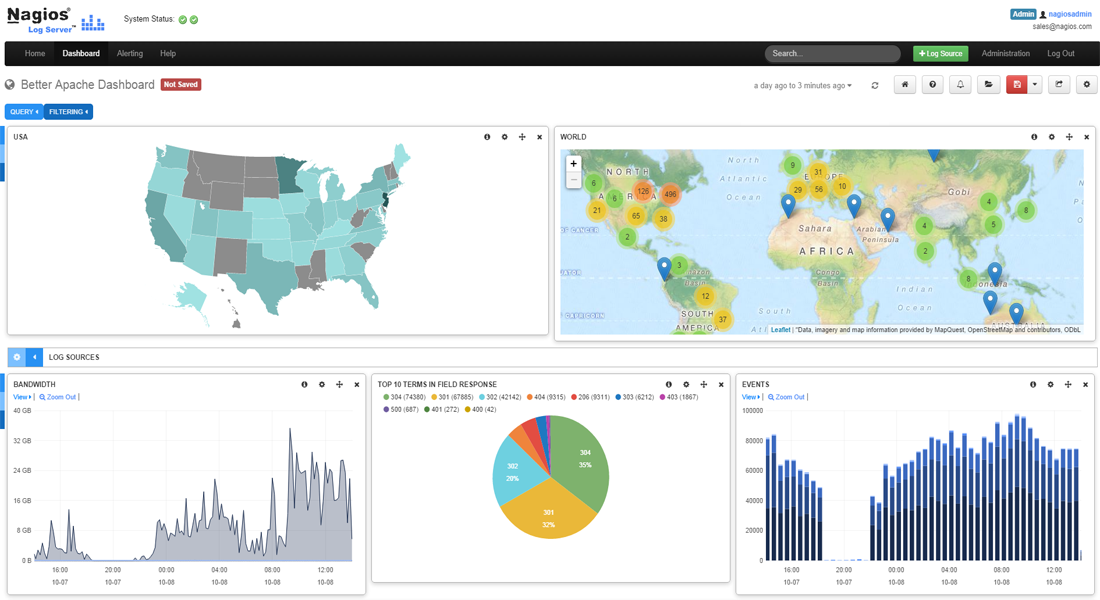
Nagios Log Server DashboardOn the surface this is a really straight forward question, and was also asked right away in the Log Monitoring and Log Management with Nagios presentation I gave at the Nagios World Conference.  Nagios Log Server does in fact use the ELK stack, and we are surely glad we chose the stack we did because of the outstanding performance, reliability, redundancy and expandability that it allows Log Server to take advantage of to build this spectacular product.

While both options allow a platform that will give the ability to index and analyze logs from various systems such as syslog, Windows Event Log, text based logs and many many more, Nagios Log Server was designed to be a full featured Log Management product, taking into account the needs of enterprise customers that require important items such as security and role based authentication.

So what makes Nagios Log Server stand out above the competition?  Usually, it all comes down to cost.  While other solutions may be “free” there is no such thing as free lunch, and the man hours learning about “free” technology, as well as the man hours configuring and maintaining such a system must be accounted for.  Additionally, once the “free” system is deployed, who do you contact when something goes wrong, and what is the associated cost?

Added Value

To the point of added value I will list below the extra / added functionality that Nagios Log Server brings to the table over the standard ELK stack.  For the most part, Nagios Log Server simply delivers the missing pieces expected in an enterprise solution, and at the same time provides commercial support for the product as well as saving many organization a ton of money, simply because we at Nagios have done the work figuring out all of the complex features, instead of you having to roll your own system out so to speak. Below is a short list of some of the value added features:

  • Commercial Support – This one item alone makes Log Server stand out.  All licenses come with customer only support.
  • Easy installation – Setup is incredibly easy, either start with a pre-created VM or run a simple install script and your Log Server will be online in a few minutes.  Setting up ELK for production does take a fair amount of knowledge for best practices, although they do make it pretty easy to get going in development environment.
  • Easy cluster formation – Log Server makes sure every member of the cluster knows which IP’s/hostnames it should communicate with and constantly keeps the list current.  While ELK does uses multicast discovery by default, this is almost never recommended in production.
  • Authenticated UI and API – Believe it or not, the ELK stack does not come with any semblance of authentication or authorization, which means anyone that can access the ELK system on the network can not only read, but Delete or Modify your sensitive log data. Log Server has full authentication and authorization to all difference users access to different information, as well as an API that is secured with keyed access.
  • Easy Log Source Wizards and Scripts – Built into Log Server are many easy setup instruction and scripts to make setting up various systems such as Windows Event Logs, or rsyslog a breeze to start sending logs into log server.  Additionally, we have built in easy import functionality to get historical logs into Log Server.
  • GUI based logstash configuration – I believe Log Server has the only GUI based logstash configuration management system in existence.  Easily add logstash configuration inputs, filters, and outputs, with full drag and drop functionality.  On top of that, from one central interface you can add, edit, modify and deploy the configuration files to ALL of the servers in your cluster instead of manually editing configuration files via text editor on each system manually.
  • Per user savable Dashboards – Users can save their custom dashboards that represent the log data the way they like to visualize it.  Each user can have any number of custom dashboards.
  • Per user savable Queries – Queries can be saved separate from dashboards, and you can apply different queries to be viewed in different dashboards.
  • Global Dashboards and Queries – Both queries and dashboards can be saved as Global by administrators so other individuals can use them.
  • Alerting based on Queries – Log server adds the ability to get alerts based on any query.  alerts can be sent via email, sent to a Nagios Monitoring server, sent to an SNMP Trap Receiver, or passed to a custom script for execution.
  • Automated Backup and Maintenance – Automated backup management is part of Log Server, and is basically set it and forget it function.  Once you have set where you want your backup information stored, it will keep all of your precious logs safe and secure there in case you need to retrieve them in the future.
  • GUI based Cluster Management – At a glance view and management of the Log Server cluster status right through the GUI.
  • GUI based Instance Management – Granular view of every member of the cluster, including about 60 metrics such as, disk utilization, memory usage, system load, and so much more.
  • GUI based Index Management – Detailed view (another 25 metrics per index) and actions on every index in the cluster, such as document count, size, and ability to open close, and delete indexes.

Any Downside to Log Server?

This is somewhat a loaded question, I’ll try to be as objective as I can.  I can really only think of two.

  • Not Always Free – While Log Server does offer a free version for a single instance up to an average of 500MB/day, Log Server is commercial software and isn’t free when scaled out to multiple instances, however, with an introductory price of $995, almost all organizations would have spent 10X that much in man hours alone just having their technical staff learn how to install and configure all of the open source components properly.  Once your team has figured it all out, you would have to create any of the above items if they are of value to your organization.
  • Currently Requires CentOS or RHEL – Currently Nagios Log Server is only supported on CentOS or RHEL operating systems, however we are working to get distributions on other operating systems available, and it can be run in a VM on virtually any OS.

We welcome additional questions in the comments below.  Feel free to take Nagios Log Server for a fully functional 90 day free trial.

Nagios Log Server Available in Amazon EC2

$
0
0

Amazon Web Services (AWS)We are pleased to announce that you can now easily launch your Nagios Log Server monitoring server in the Amazon Elastic Compute Cloud (EC2). We have clean CentOS 6 images with Nagios Log Server pre-installed available for public and customer use. This makes it extremely easy for Nagios Log Server administrators to start additional servers without the need to procure or invest in hardware. Additionally, those wishing to demo Nagios Log Server can easily do so using the cloud.

Nagios Log Server is a powerful enterprise-class log monitoring and management application that allows organizations to quickly and easily view, sort, and configure logs from any source on any given network. Log Server is designed to analyze, collect, and store log data based on custom specifications, and provide users with extended insight into the data on their network’s infrastructure.

View a full how-to document on launching a new pre-installed Nagios Log Server server in the Amazon EC2 cloud: Using Nagios Log Server In Amazon EC2 Cloud

If you are new to Nagios Log Server and would like to see it in action, this would be a fast and efficient way to give it a test run. The pre-configured image comes with a fully functional 90 day free trial.


Nagios Cloud Solutions Now Available in Frankfurt Amazon EC2 Region

$
0
0

TheAmazon Web Services (AWS) latest Nagios XI, Network Analyzer, and Log Server – Amazon EC2 cloud images have been pushed out to the following additional location:

  • Europe (Frankfurt)

The Nagios cloud images are an excellent opportunity to leverage the capabilities of Nagios XI, Network Analyzer, and Log Server in your environment without having the upfront expense of dedicated hardware and maintaining the ability to upgrade your system with virtually zero downtime.

Documentation on using the Amazon cloud images for your Nagios XI deployment may be found on the Exchange.

Using Nagios XI In Amazon EC2 Cloud

Using Nagios Network Analyzer In Amazon EC2 Cloud

Using Nagios Log Server In Amazon EC2 Cloud

These documents describe how to launch new pre-installed Nagios servers in the Amazon EC2 cloud and is intended for Nagios Administrators who would like to bring up new Nagios instances in the Amazon Elastic Compute Cloud (EC2), as well as those who are moving existing installations to the cloud.

Start a trial copy of Nagios solutions in the cloud today!


Nagios XI VMware Virtualization Wizard Released

$
0
0

Nagios Enterprises is excited to announce the release of the VMware Virtualization Wizard for Nagios XI.

The VMware Virtualization Wizard monitors your VMware virtual environment by offloading the VMware checks to a vSphere Management Assistance (vMA) appliance.

This is achieved by utilizing the plugin box293_check_vmware, which has been written specifically for use on the vMA. Troy Lea (the author of box293_check_vmware) received a lot of feedback at the VMworld Conference after giving his talk on the plugin.

Why use the box293_check_vmware plugin? The plugin utilizes the VMware SDK. The SDK is notoriously CPU and Memory hungry, which can easily overload and cripple your Nagios XI host. By offloading the plugin to the vMA appliance, your Nagios XI server will not be affected as you monitor your VMware virtual environment.

The VMware Virtualization Wizard and installation instructions are available for download from the Nagios Exchange.

Troy Lea presented on “Monitoring VMware Virtualization Using vMA & The Plugin box293_check_vmware” at the 2014 Nagios World Conference in St. Paul, MN. You may view his presentation in the video below:

Watch this video on YouTube.

View the presentation slide deck on SlideShare.

How to Monitor MySQL Logs with Nagios Log Server

$
0
0

Many times when you run out of disk space on the Nagios XI server or you don’t shut down the VM properly, you end up with crashed tables in the MySQL database. One way to solve this issue is to monitor the mysqld.log for errors, and fix the problems in a timely matter. You can easily achieve this goal by monitoring the MySQL logs via  Nagios Log Server.

In this article, I will show you how to set up MySQL monitoring in Nagios Log Server, how to use simple searches and how to filter the results.

Adding MySQL Server Log Source

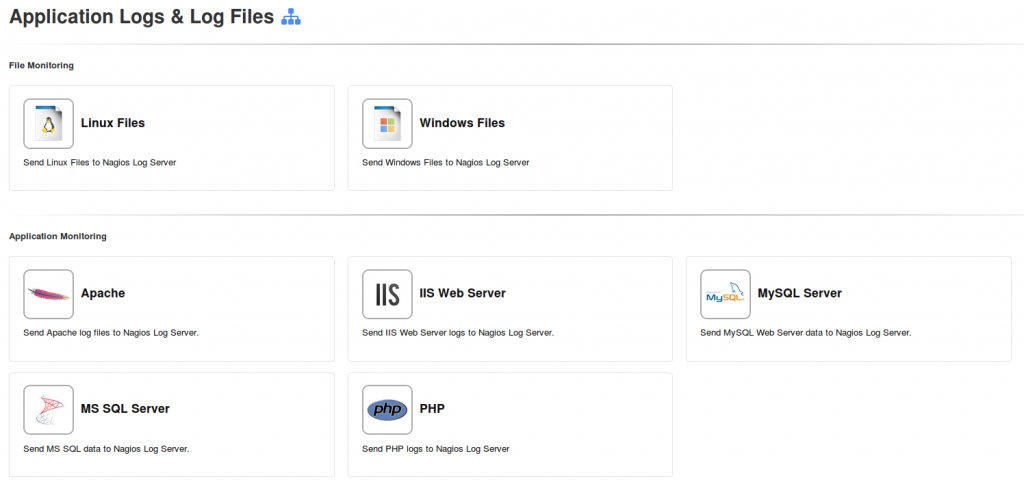
From the Nagios Log Server Home page, click on the +Log Source menu in the upper-right corner, then click on the MySQL Server link under the “Application Logs & Log Files” section.

Adding a Log Source - Nagios Log Server

Application Logs & Log Files - Nagios Log Server Setup

From here – just follow the steps outlined on the MySQL Setup page.

After Nagios XI has been configured to send MySQL logs to Nagios Log Server, you need to verify that logs are being received. Simply click on the Dashboard menu. From there, you can run some queries and filter the results.

Performing Searches

You need to keep a couple of things in mind when running your queries:

  1. You can use single keywords or expressions, wrapped in double quotes. Words must be “specific”, otherwise you may get many “false positives”. You can join words via “AND” or “&&”. Search is NOT case sensitive (at least for now).
  2. Queries are NOT cached, so using too many words/expressions will slow down your searches. especially in large environments.

Here are a few examples of how I used queries in Nagios Log Server to find issues with MySQL database. I encourage you to experiment and see what words/expressions work the best for you.

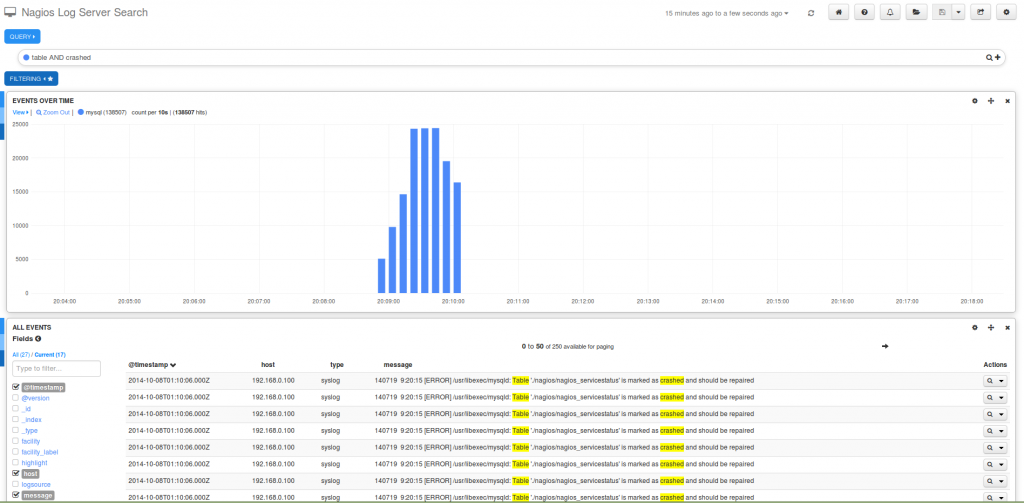
When there is a crashed table in the MySQL database, you usually see an error in the mysqld.log, similar to this one:

140719 9:20:15 [ERROR] /usr/libexec/mysqld: Table './nagios/nagios_servicestatus' is marked as crashed and should be repaired

For my search, I used “table AND crashed”.

Nagios Log Server Search

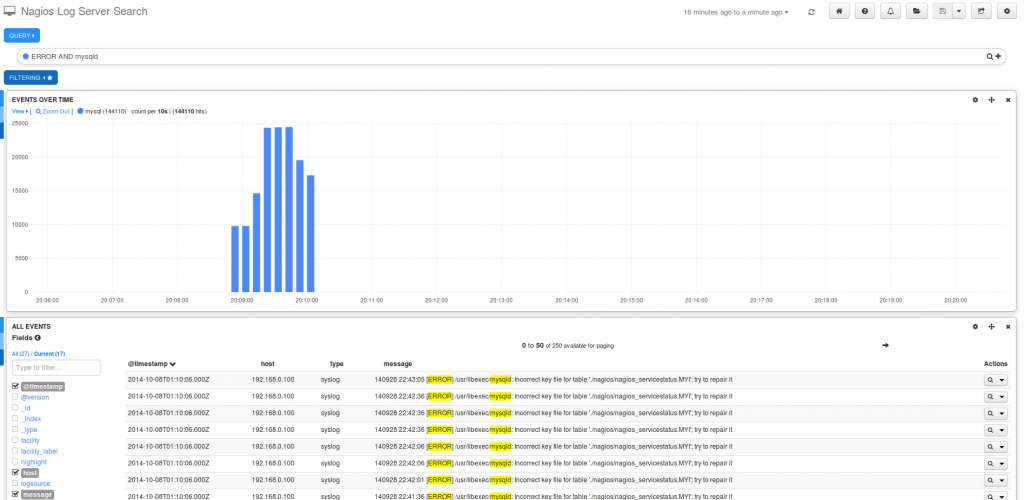
An additional example referencing a different error is listed below:

140928 22:43:05 [ERROR] /usr/libexec/mysqld: Incorrect key file for table './nagios/nagios_servicestatus.MYI'; try to repair it

You could search by entering in the query search box “ERROR AND mysqld” or “error AND mysqld” – again the search is not case sensitive.

Nagios Log Server Search

Again, you can experiment with the choice of words. If you searched for “connect AND mysql”, you could find errors, similar to this one:

Error: Could not connect to MySQL database: Can't connect to local MySQL server through socket '/var/lib/mysql/mysql.sock' (2)

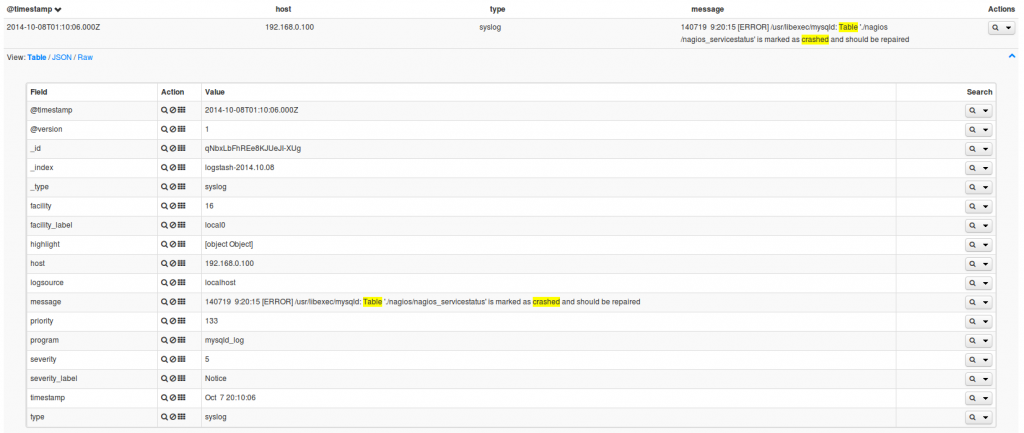
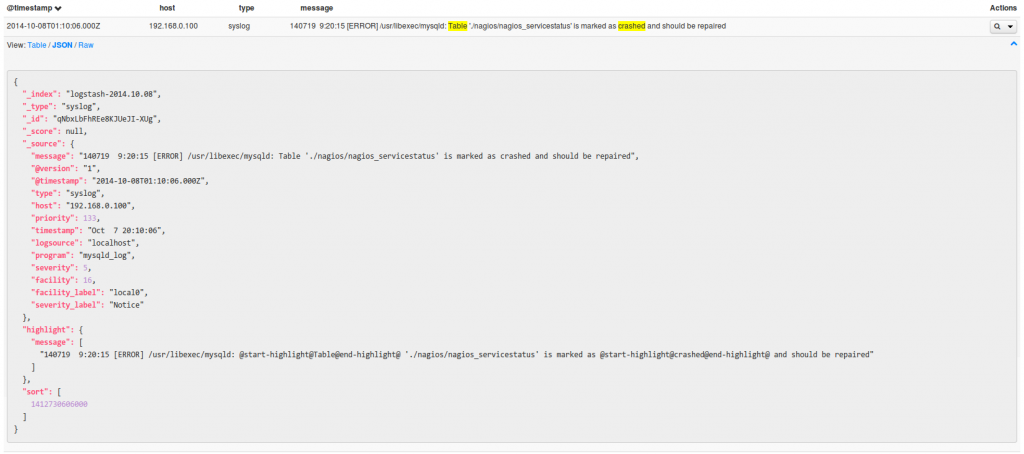
Once you find the error message, you can click on it to see more details. You can view it in a “Table”, “JSON”, and “Raw” format.

Nagios Log Server Details - Table, JSON, RAW

Nagios Log Server - JSON Details

Now that you’ve learned more about the usage of search keywords, it’s time to look at filtering.

Filtering Results

Filters are cached, so using the correct filters can and will speed up your searches. Each time you run a query, a “timestamp” filter is applied by default. You can add more filters by clicking on the FILTERING, then clicking on the “+” button.

Adding a Syslog Filter - Nagios Log Server

It is a good idea to specify type (i.e. “syslog”). In this particular case, this wouldn’t make any difference as mysql logs are sent to syslog anyway, but for filtering other searches, this could be very useful. If you are concerned about a particular host, you could use the host’s IP address in your filter in order to limit the results. You can use many different filters, wildcard, etc. You also can include/exclude queries by using must, mustNot, and either from the querystring drop-down menu.

Want to try Nagios Log Server? Download a free trial today at: go.nagios.com/logserver

To view Nagios Log Server documentation, visit: http://library/products/nagios-log-server/documentation

If you have any questions and issues, please post them on the Nagios Support Forum at: http://support.nagios.com/forum

Happy Monitoring!

FREAK Vulnerability Tester

$
0
0

With yesterday’s disclosure of the new SSL/TLS vulnerability dubbed FREAK, we at Nagios decided to take some action to assist the community with a quick and easy tester to help determine if a server is vulnerable to (CVE-2015-0204).

If you are not familiar with the FREAK Vulnerability, here is a brief description from https://freakattack.com/ :

A connection is vulnerable if the server accepts RSA_EXPORT cipher suites and the client either offers an RSA_EXPORT suite or is using a version of OpenSSL that is vulnerable to CVE-2015-0204. Vulnerable clients include many Google and Apple devices (which use unpatched OpenSSL), a large number of embedded systems, and many other software products that use TLS behind the scenes without disabling the vulnerable cryptographic suites.


At Nagios, we take security vulnerabilities very seriously and when possible like to offer the ability to perform a quick check directly from our website.

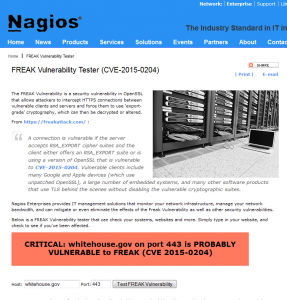
Enter FREAK Vulnerability Tester (CVE-2015-0204)

FREAK Vulnerability Tester (CVE-2015-0204)


Nagios Enterprises provides IT management solutions that monitor your network infrastructure, manage your network bandwidth, and can mitigate or even eliminate the effects of the FREAK Vulnerability as well as other security vulnerabilities.

For most servers that are found to be vulnerable administrators should be able to update the OpenSSL package and then restart the affected services such as httpd.

If your server is running RHEL or CentOS, the following commands will resolve the security vulnerability:

yum update openssl -y
service httpd restart

If you are already using Nagios Core or XI to monitor your infrastructure, this easy-to-use plugin can notify you if your system is susceptible to the FREAK vulnerability.

Download the check_freak Plugin

If you haven’t experienced the benefits of monitoring with Nagios, be sure to check out our products page.

Announcing the New Naming Scheme for Nagios Enterprise Products

$
0
0

You may have noticed that the naming scheme for several products has undergone a change.

Nagios Network Analyzer was the first product to make the switch to the new scheme – moving from version 2014R1.9 to version 2R1.0. Nagios XI will follow, moving from version 2014R2.7 to version 5R1.0. This change largely represents clarity and uniformity across our product line – the ultimate goal is reducing confusion.

In addition, the naming change provides key benefits internally, including:

  • Increased development workflow clarity, especially regarding revision software.
  • The ability to better coordinate our releases by changing the appropriate version number.

In addition to the above benefits, we think that the new naming scheme has a nice ring to it. We hope that the naming scheme change isn’t too confusing – let us know if you have any questions!

Monitor logs on Windows Domain Controllers using Nagios Log Server

$
0
0

Here’s how to Monitor logs on Windows Domain Controllers using Nagios Log Server:

If you’ve got a large and complex Microsoft Windows domain with multiple domain controllers (DC) then you’ll understand that sometimes it’s hard to track down certain events:

  • When was a user added to a particular group?
  • When was a user added to the domain?
  • When did the user change their password?
  • When was a user account locked out?
  • When was a user account deleted?

A lot of the difficulties arise because the user account could be talking to a number of different DC’s. To find out some of this information you need to search each DC event logs separately which is time consuming, tedious and the logs could be removed after a point in time.

Nagios Log Server to the rescue! By forwarding your DC’s logs to Nagios Log Sever, you can access all this information from one location quickly. You also have a record of all events stored on Nagios Log Server! (As we all know, when you clear the event logs on a Windows server they are gone forever.)

Monitor logs on Windows Domain Controllers

Getting It Setup:

How much work is required getting this set up?

  • From each DC open a web browser to your Nagios Log Server
    (Download a free 60 day trial of Nagios Log Server here.)
  • On the Home tab click the Windows Log Source icon
  • Download Nxlog using the link provided and install it on your DC
  • Update the nxlog.conf file on the DC with the code on the screen
  • Start Nxlog

That’s all there is too it, your DC’s are now sending their logs to your Nagios Log Server. Sit back and relax, the hard stuff is done!

So now that you’re receiving these logs, how do you search these logs and find out “important stuff”?  You do all this through Dashboards. Here’s how…

On the menu bar click Dashboards.

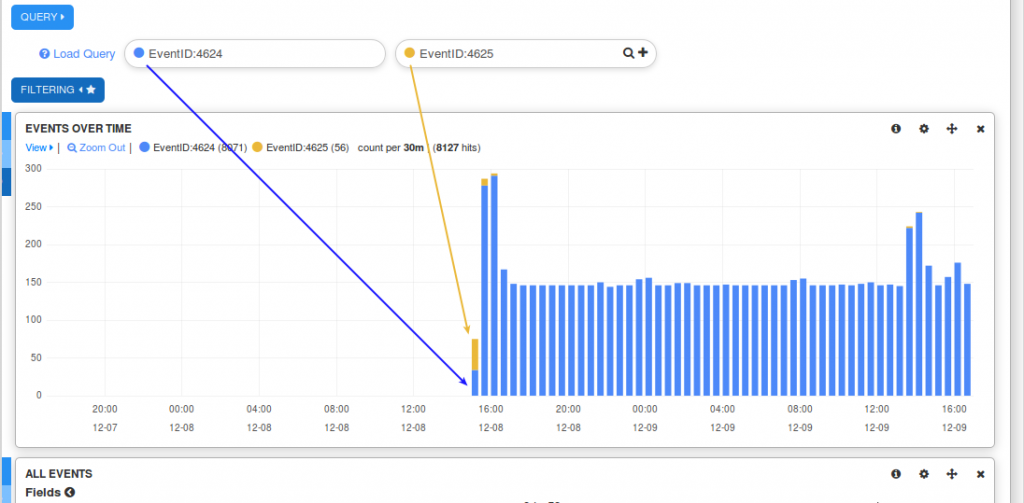
Let’s start off with searching for all successful logon attempts:

In the Query field type in EventID:4624 and press Enter


Now you’ll add an additional search for all failed logon attempts:

In the Query field, on the far right side click the plus + icon

Now you have a second query.

In the new Query field type in EventID:4625 and press Enter


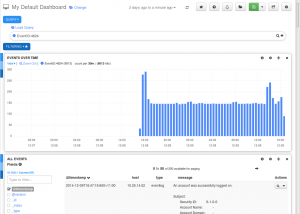
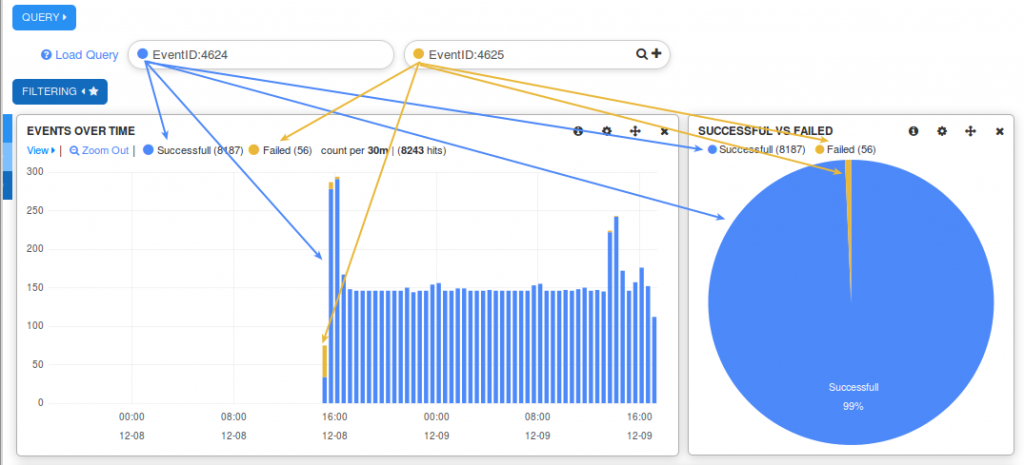
Now you can see both queries with different colors. You can also turn this data into charts.

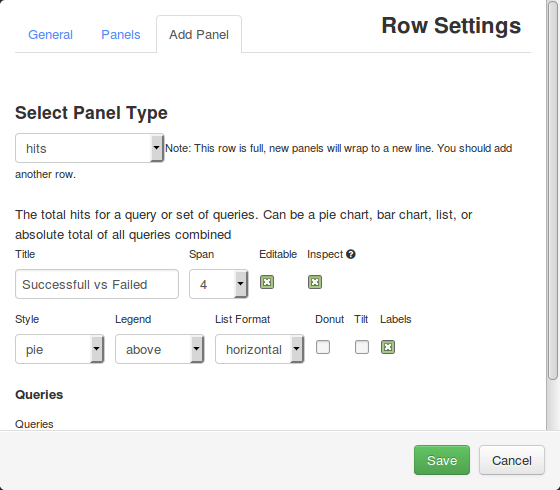
On the left of “EVENTS OVER TIME” hover over the three blue bars and click Add Panel.

Select the Panel Type Hits and then select the Style pie.

Click Save

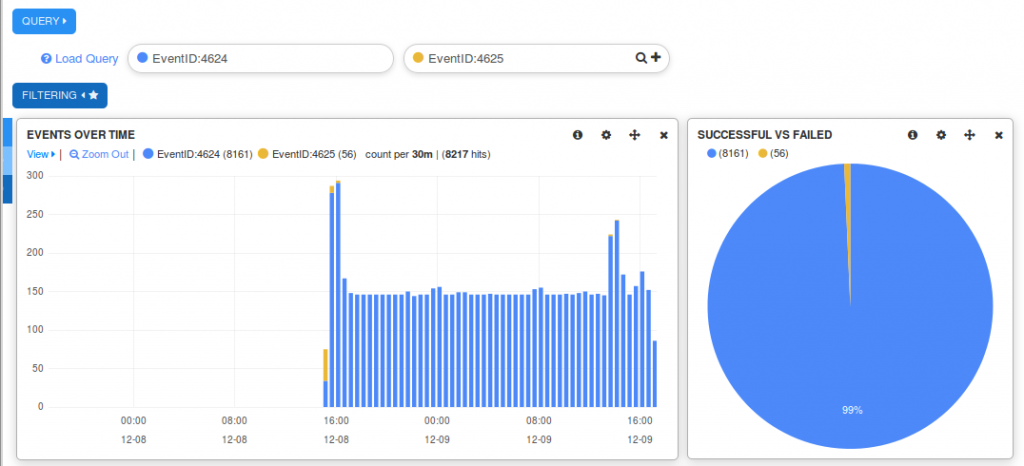
Great. But hold on, we can put it to the right of the EVENTS OVER TIME.

Click the Configure icon (gear) on the top right of the EVENTS OVER TIME panel.

Change the Span to 8

Click Save


Now one last thing you can do is label the different queries:

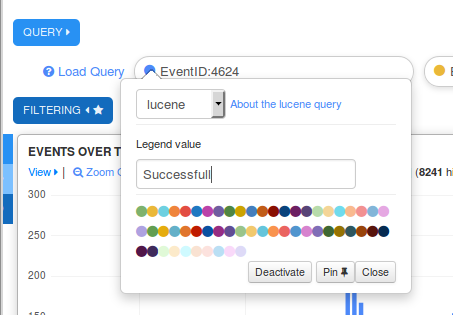
For the first query, click the colored circle to the left of the query.

Now you can type a something in the Legend value field and then click Close.

Repeat for the second query.

Now you have something that looks like this (without all the arrows of course):


Finally, you can save this Dashboard to look at it later.

At the top right, next to the floppy disk icon, click the Down Arrow button icon.

Give it a name like Successful vs Failed Logons and press Enter.

Now you can load this dashboard at a later stage, here’s how:

On the menu bar click Dashboards.

You are back to a default dashboard.

At the top right, click the Folder icon (Load).

Click on the Successful vs Failed Logons dashboard.

OK that’s enough pretty stuff, time to get serious.


Alerting

How can you alarm when such events are happening?

Once you fine tune your query, you can generate alerts based on the query.

At the top right, click the Bell icon.

Here you can specify the options for the alert, thresholds and what the alert method should be.


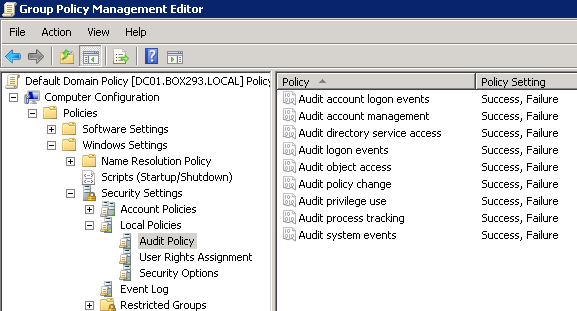
Enable Auditing in Group Policy

Using Group Policy Management console you can set the domain wide audit policy to make sure success and failure events are logged.

  • Edit the Default Domain Policy
  • Expand Computer Configuration > Policies > Windows Settings > Security Settings > Local Policies > Audit Policy
  • Once you change a setting it is saved instantly, it may take a little time to propagate through the domain.


What can Nagios Log Server alert you to?

Here’s some different queries to get you thinking:

  • Domain account had “Don’t Expire Password” Enabled
    EventID:4738 AND UserAccountControl:2089
  • Domain account password was changed for a special account called “reports_account”
    EventID:4724 AND SubjectUserName:reports_account
  • Domain account password change failed
    EventID:4723 AND EventType:AUDIT_FAILURE
  • Domain account was locked out
    EventID:4740
  • Domain account was unlocked
    EventID:4767
  • System security access was granted to an account
    EventID:4717
  • A user account was ADDED to Domain Admins
    EventID:4728 AND TargetUserName:"Domain Admins"
  • A user account was REMOVED from Domain Admins
    EventID:4729 AND TargetUserName:"Domain Admins"
  • A user account was DELETED
    EventID:4726
  • Someone has altered the Audit and Account policies in the system
    EventID:4719 OR EventID:4739
  • Windows Firewall Events
    EventID:5031 OR EventID:5154 OR EventID:5155 OR EventID:5156 OR EventID:5157 OR EventID:5158 OR EventID:5159


Further Reading

The following link is a great resource for identifying what the purpose of an EventID number is.

Description of security events in Windows Vista and in Windows Server 2008

http://support.microsoft.com/kb/947226


Want to try Nagios Log Server? Download a free trial today at: https://www.nagios.com/downloads/nagios-log-server/

To view Nagios Log Server documentation, visit: http://library/products/nagios-log-server/documentation

If you have any questions and issues, please post them on the Nagios Support Forum at: http://support.nagios.com/forum


Happy Monitoring!

Monitor the End of the World (or any other event of your choosing) with Nagios XI!

$
0
0

Nagios XI is extremely flexible, perhaps more flexible than most people realize!

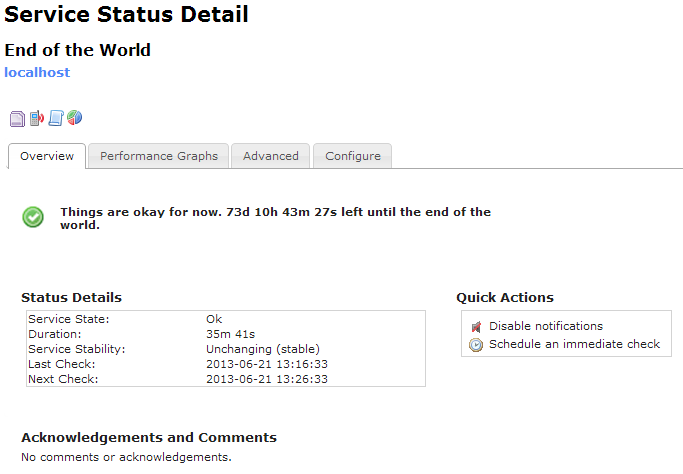
To showcase the flexibility of Nagios XI, President and Founder of Nagios – Ethan Galstad, has developed the plugin Doomsday Check  to monitor an arbitrary doomsday date (of your choosing) with customizable warning and critical thresholds.

Although this plugin may not be very practical in a networking environment, it’s fun to play around with and is definitely worth a try.


Service Status Detail


If you would like to use this plugin, simply download it here to your plugins directory (/usr/local/nagios/libexec/), make it executable (`chmod +x check_doomsday.php`), and create a service for it.

You can find more information on how to manage plugins in Nagios XI in this document. If you are an XI customer you may also watch this video.

If you are new to Nagios XI, you can test drive it free for 60 Days by downloading the trial.

Also, the Nagios World Conference is fast approaching! Register here today!


How To Upgrade Nagios XI From Web UI

$
0
0

If you are using Nagios XI 2014 or later, you can upgrade your Nagios XI instance easily from the web UI, provided your server is connected to the Internet.

Upgrade Nagios XI From Web UI

Here’s how you do it:

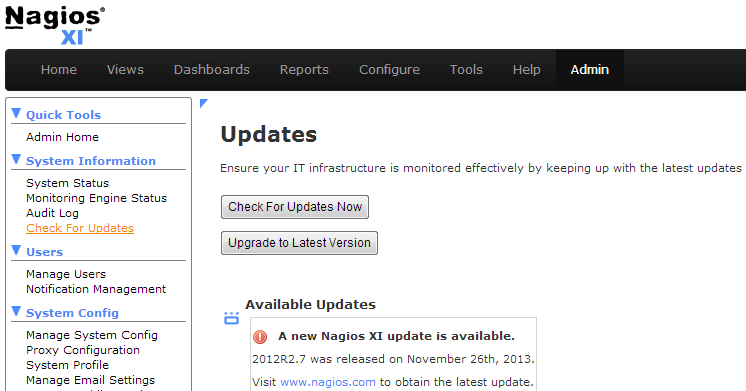
From the Nagios XI web interface navigate to the Admin menu, click Check for Updates menu on the left, then click Check For Updates Now. If an update exists, the most recent version will be displayed and you can click the Upgrade to Latest Version button to start the upgrade process.

Note: If you are running the most current version, the Upgrade to Latest Version button will not be displayed.

Check For Updates

Next a pop-up window will ask are whether you sure you want to upgrade Nagios XI. If you’re ready to make the upgrade, click OK.

Note: The pop-up warns you again to back up any edited files which you do not want to be overwritten and clarifies that components are not overwritten unless they are core XI components. To clarify which components are considered core XI components go to Admin → Manage Components. Core components are identified by a Type equal to “Core”.

Upgrading Pop Up

The upgrade process will start automatically.

Note: The upgrade process can take a few minutes depending on the size of your Nagios XI installation. Please be patient.

Upgrading in Nagios XI

Once the upgrade completes, you will see a green box stating the update was successful and a button to complete the upgrade. Click the Complete Upgrade button.

Upgrade Completed Successfully

Nagios XI will now display the most recent version of the software when you navigate to the Admin → Check For Updates page.

Check For Updates

You have now successfully upgraded your Nagios XI software from the web user interface!

You can view our document on how to upgrade Nagios XI using the Web UI by clicking on the link below:

Nagios XI – How to Upgrade Using the Web UI

Note: If there is an error for whatever reason, a red box will appear and you may need to upgrade manually. The most common reason for this would be no internet access.

For instructions on how to upgrade manually, view the document linked below:

How To Manually Upgrade Nagios XI

If you’re new to Nagios XI, download the free fully functional 60 Day Trial to get started!

Happy Monitoring!

Utilizing a RAM Disk in Nagios XI – the Easy Way

$
0
0

If you have a very large Nagios XI instance, and you are experiencing high I\O wait time, and high check latencies, you have a couple of options – buy extremely fast hard drives or add RAM disk on the local filesystem.

Setting up a RAM disk manually requires a modification of numerous files – nagios.cfg, config.inc.php, npcd.cfg, etc. Skipping just one of the required steps or making a typo will result in various issues with performance data files not being processed, graphs not being displayed, etc.

In order to make the process of utilizing a RAM disk in Nagios XI a lot easier for users, we developed a bash script that automates the whole process. All you need to do now is run four simple commands:

cd /tmp
wget http://assets.nagios.com/downloads/nagiosxi/scripts/install_ramdisk.sh
chmod +x install_ramdisk.sh
./install_ramdisk.sh

The script will check for old or incomplete RAM disk installs, and will exit if any are found. If no previous RAM disk installs are found, the script will:

1. Backup all of the configs that are about to be modified and place them in the newly created “/tmp/ramdiskbackup/” directory.

2. Determine the recommended size of the RAM disk that is needed, and set it up automatically. You have an option to change the size of the RAM disk if you need to use a different value.

3. Modify various configs such as nagios.cfg, config.inc.php, npcd.cfg, etc.

4. Restart services.

5. Give you a confirmation that the RAM disk was installed successfully.

If you prefer to set up a RAM disk manually, please follow the steps outlined in our documentation (under the “Manual RAM Disk Installation” section):

https://assets.nagios.com/downloads/nagiosxi/docs/Utilizing_A_RAM_Disk_In_NagiosXI.pdf

As always, we would appreciate any feedback – good or bad, tips for improvement, etc.

Happy monitoring!

Enabling SNMP on Cisco Router – Cisco Devices

$
0
0

SNMP – Enabling SNMP on Cisco Router

—-

We’ve had a lot of questions on the process for configuring SNMP on Cisco devices, mainly routers and switches, in this article we will give you the steps on how to configure SNMP on Cisco routers (and Catalyst switches).

Note: We’ve tested these commands in our lab but if you have any additional questions on what may be required for your environment, please reach out to your network administrator and/or Cisco to verify that they will work with your specific devices.

1. SSH or Telnet into your router/switch:

* We recommend enabling SSH and disabling telnet wherever possible because telnet will send all the information you enter (including usernames and passwords) as plaintext across your network because it is a insecure protocol.

If you’re connecting from Linux
——————————-
ssh user@X.X.X.X

OR

telnet X.X.X.X

If you’re connecting from Windows
———————————
You can connect with Putty or another SSH/Telnet client. Just type in the router/switch IP address and select the SSH or Telnet protocol when connecting.

2. Enter enable mode:
enable

3. Enter into configuration mode:
configure terminal

4. Setup a read-only SNMP community on the device so that you can monitor it with Nagios:
snmp-server community YOURCOMMUNITY ro

* We recommend that you come up with a complex SNMP community string (capitals, lowercase, alpha-numeric characters) but don’t use any special characters because not all software will work with them in it.

5. Exit configuration mode and save the changes you’ve made:
exit
write memory

Here are the configuration commands (simplified):

MYROUTER>enable
Password:
MYROUTER#configure terminal
Enter configuration commands, one per line.  End with CNTL/Z.
MYROUTER(config)#snmp-server community YOURCOMMUNITY ro
MYROUTER(config)#exit
*Mar  1 00:14:40.987: %SYS-5-CONFIG_I: Configured from console by console
MYROUTER#write memory
Building configuration…
[OK]
MYROUTER#exit

Configuring SNMP Traps

———-

SNMP traps are a great way of getting alerted from a device in near real-time. When you setup SNMP traps on your compatible device and it detects an error (or another piece of information you’ve set as a trap), the device will send a trap immediately through SNMP to your Nagios server so that you can act on it according to your Nagios configurations.

Here is the process for settings up SNMP traps on your Cisco devices:

1. SSH or telnet into your router/switch.
ssh user@X.X.X.X

* We recommend enabling SSH and disabling telnet wherever possible because telnet will send all the information you enter (including usernames and passwords) as plaintext across your network.

OR

telnet X.X.X.X

2. Enter enable mode:
enable

3. Enter into configuration mode:
configure terminal

4. Setup your Nagios server as the trap target:
snmp-server host NAGIOSIPADDRESS version 2c YOURCOMMUNITY

5. Setting up the type of SNMP traps that you want to send:
You can enable all SNMP traps with this command:

snmp-server enable traps

or you can enable individual traps with the command template:

snmp-server enable traps [notification-type [notification-options]]

As an example, to setup SNMP traps for OSPF errors you would run this command:

snmp-server enable traps ospf errors

6. Exit configuration mode and save the changes you’ve made:
exit
write memory

Here are the configuration commands (simplified):

MYROUTER>enable
Password:
MYROUTER#configure terminal
Enter configuration commands, one per line.  End with CNTL/Z.
MYROUTER(config)#snmp-server host IPADDRESS version 2c YOURCOMMUNITY
MYROUTER(config)#snmp-server enable traps
MYROUTER(config)#exit
*Mar  1 00:14:40.987: %SYS-5-CONFIG_I: Configured from console by console
MYROUTER#write memory
Building configuration…
[OK]
MYROUTER#exit

You can read more about setting up SNMP traps with Nagios XI here.

https://assets.nagios.com/downloads/nagiosxi/docs/Integrating_SNMP_Traps_With_Nagios_XI.pdf

How To Set Up A Nagios XI License Maintenance Status Check

$
0
0

There are a few ways to set up a Nagios XI license maintenance status check. It is also very easy to check the Nagios XI license maintenance status inside Nagios XI. Here’s how…

Once logged in to Nagios XI you can navigate to the Admin menu then click on the License Information link on the left (However, many administrators simply forget to do so!). From the License Information screen you can view the time remaining on your license and/or click the renew now link to begin the renewal process. That’s all there is to it; nice and easy!

Setting Up a license Status Check in Nagios XI

Some Nagios XI users showed interest in setting up a license status check in XI. Having such a check makes perfect sense.  If you were notified that your license is about to expire, you would renew it on time thus avoiding any possible service interruptions. Also, you may be running several Nagios XI instances. You wouldn’t want to log in to each one just to check when each license expires. You could monitor all of the licenses from one central Nagios XI server.

I wrote a small bash script, which can be used to set up a license status check in XI. You can download the plugin from here:

http://assets.nagios.com/downloads/nagiosxi/scripts/check_license.sh

Install it as you would normally install any other plugin in Nagios XI.

Admin -> Manage Plugins -> Browse -> check_license.sh -> Upload Plugin

You can test the plugin from the command line by running:

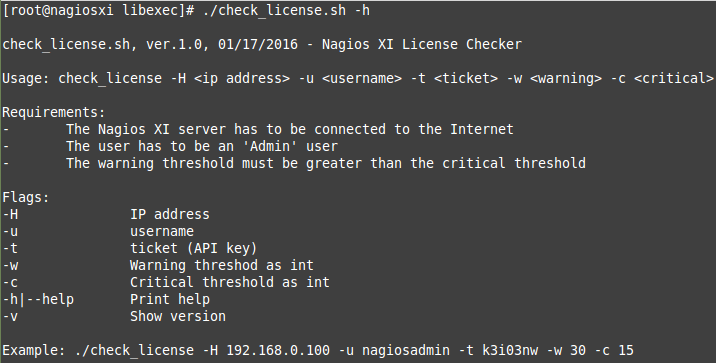
/usr/local/nagios/libexec/check_license.sh -H <ip address> -t <ticket> -w <warning> -c <critical>

To view the usage (help) menu, run the plugin with passing a “-h” or “–help” flag.

nagios license status check

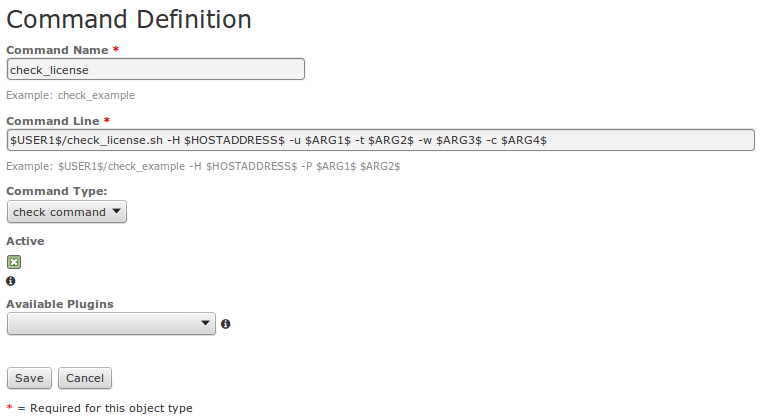
After you verify that the plugin works from the command line (see the example in the help menu), you can proceed with setting up a command and a service check under the Core Config Manager in Nagios XI.

check nagios license status


nagios check license

Save and Apply Configuration.

From the Nagios XI web interface go to the “Service Detail” menu and click on the newly added service. Schedule a forced immediate check to make sure the check returns the expected output.

service detail screen of license check status in nagios xi

For more information, please review our documentation (“Nagios XI – How To Set Up A Nagios XI License Maintenance Status Check“):

https://assets.nagios.com/downloads/nagiosxi/docs/How-To-Set-Up-A-Nagios-XI-License-Maintenance-Status-Check.pdf

Happy Monitoring!

Extending Nagios functionality with libnagios

$
0
0

Have you ever attempted to write a function in C to execute a command and parse the output? I think I’d rather just let the Nagios library do the heavy lifting for me.

This blog post is going to cover the basics of compiling libnagios, and linking the Nagios library to your application. I’ll be focusing on using some of the built-in Nagios functionality, specifically the runcmd_open() function.

I’m going to assume you have a sane build environment set up (where tools like make and ./configure are working) before we go any further. If you are following along, now would be the time to get these in order.

First, download the source code and extract it. You can get a copy of the Nagios Core source at https://github.com/NagiosEnterprises/nagioscore/archive/master.zip. Once you’ve downloaded it and extracted the files, open up nagioscore-master/lib/runcmd.h (https://github.com/NagiosEnterprises/nagioscore/blob/master/lib/runcmd.h). Search for “extern int runcmd_open”, as of the time of this writing, that should bring you to line 77, where our function is declared:

/**
* Start a command from a command string
* @param[in] cmd The command to launch
* @param[out] pfd Child's stdout filedescriptor
* @param[out] pfderr Child's stderr filedescriptor
* @param[in] env Currently ignored for portability
* @param[in] iobreg The callback function to register the iobrokers for the read ends of the pipe
* @param[in] iobregarg The "arg" value to pass to iobroker_register()
*/
extern int runcmd_open(const char *cmd, int *pfd, int *pfderr, char **env,
        void (*iobreg)(int, int, void *), void *iobregarg)
    __attribute__((__nonnull__(1, 2, 3, 5, 6)));


So what does all that mean? It means we need a command to execute, a file descriptor for stdout, another filedescriptor for stderr. Our application doesn’t need a callback function to register iobrokers or a value to pass. But, since these are declared non null, we’ll have to get creative.

Let’s create a file, named test.c in the root of the nagioscore-master directory. First, we need to include our libnagios header.

#include "lib/libnagios.h"


Then we define our fake iobroker_register function. This is essentially just a placeholder, as we aren’t (yet) particularly interested in assigning a function to execute when our stdout/stderr stops reading.

/* define a fake iobroker_register function for the libnagios call */
static void fake_iobreg(int fdout, int fderr, void *arg) { }


Next, we set up our variables that we’ll be using to pass to the runcmd_open() function. We don’t need an env variable, since that argument can accept a NULL value, we’re just going to pass that in (especially since it is unused anyway).

int main(void) {
    /* set up the vars */
    int BUFFER = 128;
    char *cmd;
    int pfd[2] = {-1, -1};
    int pfderr[2] = {-1, -1};
    int fake_iobregarg = 0;
    int fd;
    char *out = calloc(1, BUFFER);
    /* lets keep this simple for now */
    asprintf(&cmd, "echo hello");


Now we execute runcmd_open(), and let the Nagios library do its magic! This will put stdout in pfd[0] and stderr in pfderr[0].

/* run the command */
    fd = runcmd_open(cmd, pfd, pfderr, NULL, fake_iobreg, &fake_iobregarg);


Let’s copy the stdout to our out var and print some information relating to the command we executed and that command’s output.

/* get the output from the stdout file descriptor into the out var */
    read(pfd[0], out, BUFFER);
    /* output our information */
    printf("The command we're executing is: %s\n", cmd);
    printf("The output of the command is: %s\n", out);


Finally, we clean up our memory and exit the program.

/* house-keeping */
    free(cmd);
    free(out);
    close(pfd[0]);
    close(pfderr[0]);
    close(fd);
    return 0;
}


Here’s the file in its entirety:

test.c

#include "../lib/libnagios.h"
/* define a fake iobroker_register function for the libnagios call */
static void fake_iobreg(int fdout, int fderr, void *arg) { }
int main(void) {
    /* set up the vars */
    int BUFFER = 128;
    char *cmd;
    int pfd[2] = {-1, -1};
    int pfderr[2] = {-1, -1};
    int fake_iobregarg = 0;
    int fd;
    char *out = calloc(1, BUFFER);
    /* lets keep this simple for now */
    asprintf(&cmd, "echo hello");
    /* run the command */
    fd = runcmd_open(cmd, pfd, pfderr, NULL, fake_iobreg, &fake_iobregarg);
    /* get the output from the stdout file descriptor into the out var */
    read(pfd[0], out, BUFFER);
    /* output our information */
    printf("The command we're executing is: %s\n", cmd);
    printf("The output of the command is: %s\n", out);
    /* house-keeping */
    free(cmd);
    free(out);
    close(pfd[0]);
    close(pfderr[0]);
    close(fd);
    return 0;
}


Let’s see it in action! First we’re going to compile our Nagios library! Open up your terminal and let’s get to library compilin’:

cd /path/to/nagioscore-master
./configure
make lib/libnagios.a
make install-lib


Those commands should have compiled your Nagios library and then placed it in /usr/local/nagios/lib. Now, we’re finally ready to compile our program:

gcc -L/usr/local/nagios/lib test.c -lnagios -o test


Now, if everything went well up this point, you should be able to execute our basic program with the following command:

./test

Your output should be similar to the following:

# ./test
The command we're executing is: echo hello
The output of the command is: hello
#

I hope that you’ve learned a few things about using the Nagios library in your own code. Questions, comments, and suggestions for future posts are all welcome below in the comments section.


– Bryan Heden

Viewing all 65 articles
Browse latest View live